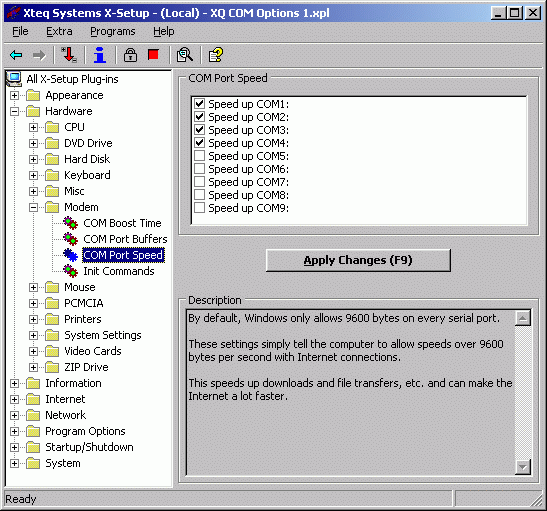
The plug-in interface (also called Default User Interface) gives you access to all settings inside X-Setup. It's ideal for advanced and power users. Note: X-Setup also provides a very easy mode to use it, the Wizard Interface; follow the link to learn more.
To start it, start the "Xteq Systems X-Setup Welcome" link using the Start -> Programs menu. Inside the "Welcome to Xteq Systems X-Setup" screen, click the "X-Setup Default UI" link.
The appearing program will look similar to the screenshot below. Click on part of the image to find out what each option does.

This is the File menu, which lets you change program options and activate important modes - for more information see the File Menu topic.
This is the Extra menu, which lets you activate some less important options - for more information see the Extra Menu topic.
This menu contains shortcuts to 'hidden' Windows utilities - for more information see the Programs Menu topic.
This is where you should come if you need help with X-Setup, or just want a few tips - for more information see the Help Menu topic.
The buttons on the toolbar let you access common X-Setup functions, like Search, Safe Mode and Help - for more information see the Toolbar topic.
This tree contains all the options that you can change in X-Setup, organized into 'folders' (or 'branches'). Here is what each icon means:
| This appears at the top of the tree, and can be used for expanding / collapsing the entire branch. This is a folder, which, when clicked on, will expand to reveal more plug-ins or folders. This indicates that the folder has been selected. This is a plug-in that has been selected This indicates a 'system critical' plug-in. This indicates a normal plug-in that hasn't been selected. This appears when the plug-in has crashed. |
Clicking on a plug-in in this tree opens it, and its options will appear in the Options panel.
This is the area where the options you can change appear. Because different plug-ins work in different ways, the plug-ins will appear differently. Some consist of a collection of checkboxes or radio buttons, some have text boxes, some are buttons, some are listboxes, and some are listboxes with checkmarks.
This is the button which lets you apply any changes you make in each plug-in (unless the plug-in consists of one or more buttons - in which case, pressing a button will apply the change). You can't make any changes to your system without clicking on this button! You can also apply changes by pressing F9 on your keyboard.
This is a description of what the plug-in does, and you should always read the description before you make any changes to your system! The description not only describes what the plug-in will change, but also any side-effects that may be caused by using the plug-in, what operating systems it should be used with and some useful links.
This tells you briefly what X-Setup is doing, for example 'loading plug-ins' or 'applying changes'.
Some options will not take effect unless you log off or restart the computer, and this indicator tells you whether you need to do this. "LOGOFF" indicates you need to log off the computer (but not restart it - you can log in again afterwards), and "RESTART" indicates that you must restart the computer. Note : Since restarting the computer requires that you log off, then you may see "LOGOFF" change to "RESTART" if you apply a plug-in that requires you to log off, and then one that requires you to restart, BUT, not vice versa (i.e. a "RESTART" will never become a "LOGOFF").